

【Android Studio初心者向け】メモ帳アプリUI設計を基礎から学ぶレイアウト/文字列
スマホで自分のアプリを動かしてみたい。
そう思ってAndroid Studioを開いた瞬間、レイアウトや文字管理で手が止まった経験はありませんか。
多くの初心者が最初につまずくのが、XMLレイアウトと文字列の扱いです。
見た目は整っても、後から修正地獄に陥るケースは驚くほど多いのが現実です😥
現場の開発では、strings.xmlによる一元管理と正しいID設計が基本です。
このルールを知っているかどうかで、開発効率も拡張性も大きく変わります💡
この記事では、メモ帳アプリを題材に基礎を実践的に整理します👇
◉ Android StudioでのUI設計の考え方
◉ activity_main.xmlを使った画面構築の基本
◉ strings.xmlで文字列を管理するメリット
◉ 崩れないConstraintLayout設計のコツ
◉ ボタン動作に不可欠なイベントリスナ
正しい土台を最初に作れば、後続の実装が驚くほどスムーズになります🚀
遠回りに見えて、これが最短ルートです。
あなたがこの記事を読み終える頃には、
「とりあえず配置」ではない、設計としてのUI構築が理解できているはずです✨
【Android Studio】メモ帳アプリのUI/レイアウト構成を基礎から身につける
まだまだ開発初期段階ですが、今回は画面レイアウト構成と文字列管理(strings.xml)についておさらいしていきます✍️
Android Studioを使ったアプリ開発、コツコツ進めていきましょう!
【復習】レイアウト/IDの正しい関係を図で再確認して次の実装に自信🔁
【ConstraintLayout】幅0dp/両端制約/余白設計のコツで崩れない画面を仕上げ🧩
以下のコードで指定した「赤文字部分」は、空いているスペースを広げる設定です。
「青文字部分」は、ボタンを右側に配置するための制約になります。
res → layout → activity_main.xml<EditText
android:id="@+id/inputText"
android:layout_width="0dp"
android:layout_weight="1"
...
app:layout_constraintEnd_toStartOf="@+id/confirmButton"
/>
<Button
android:id="@+id/confirmButton"
android:text="@string/confirm_btn_name"
...
app:layout_constraintEnd_toEndOf="parent"
/>
<TextView
android:id="@+id/outputText"
android:layout_width="0dp"
android:layout_weight="1"
...
app:layout_constraintTop_toBottomOf="@+id/inputText"
/>
【ID設計】inputText/confirmButton/outputTextを統一命名でコード参照を楽に🔖
見た目の配置ができていれば、細かいレイアウト調整は後回しでもOK😊
重要なのはIDの設定です。各要素に @+id/◯◯ のように名前をつけましょう。
✏️ 入力欄 → inputText
🆗 ボタン → confirmButton
📄 出力欄 → outputText
【strings.xml】表示文言を一元管理して多言語/修正/再利用に強いプロ設計
【文言管理】プレースホルダ/ボタン名/説明文を集中管理して更新漏れを防止🗂️
ボタンやテキストに表示する初期の文字列は、下記ファイルで一括管理できます。
res → values → strings.xml<resources>
<string name="app_name">メモ帳アプリ</string>
<string name="confirm_btn_name">追加</string>
<string name="input_text_default"></string>
<string name="output_text_default">上枠にメモを書いてください。</string>
</resources>
【理由】可読性/多言語/テスト効率が上がるstrings.xml運用の具体メリット✅
文字を直接 android:text="〇〇" と書いても動作しますが、メンテナンス性や多言語対応を考えると非推奨です🙅♂️
以下のように書いて、strings.xmlから呼び出しましょう。
android:text="@string/output_text_default"
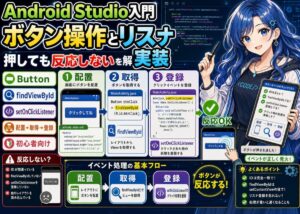
【次の一歩】ボタンクリックに反応させるイベント設計の中心概念を理解🤔
【原因】ボタンが反応しないのはリスナ未設定だから動作検知の基礎を学ぶ🔄
ボタンを設置しただけでは、クリックしても何も起こりません😥
その理由は、押されたことを検知するコード(リスナ)がないからです。
【リスナとは】ボタン押下を検知して処理を呼ぶ仕組みをKotlin/Javaで理解📌
◉ イベントリスナとは、「このボタンが押されたらこの処理をしてね!」という命令文のこと。
◉ ボタンの設定だけでなく、「ボタンが押されたらどうするか」を別途指定する必要があります。
confirmButton.setOnClickListener(new View.OnClickListener() {
 @Override
 public void onClick(View v) {
 // ボタンクリック時の処理を書く
 }
});
🚀【まとめ】UI設計/ID設計/strings.xml/リスナ基礎を総復習して次の実装
Android Studioでのアプリ開発は、派手な機能より基礎設計が重要です。
今回解説したUIと文字列管理は、すべての実装の土台になります。
見た目を作る作業に見えて、実は設計力を養う工程です。
この段階で差がつくのが、XMLレイアウトとstrings.xmlの理解です💡
📱【UI設計の要点】ConstraintLayoutで崩れない画面を作る幅0dp/制約/余白の基本
画面は単なる配置ではありません。
拡張・修正・再利用を前提に設計するものです。
◉ activity_main.xmlでは配置と役割を明確化
◉ ConstraintLayoutで崩れない画面構造を作成
◉ 幅0dpと制約設計で柔軟なUIを実現
◉ ID命名でコード可読性と保守性を確保
🧩【ID設計のコツ】Android Studioで入力/追加/表示を統一命名し参照ミスを防ぐ
IDは見た目ではなくプログラムとの接点です。
適当な命名は後のバグや混乱の原因になります。
◉ Android Studio開発では統一命名が鉄則
◉ inputText / confirmButton / outputTextのような直感設計
◉ UI変更時でもコード修正を最小化
◉ チーム開発でも理解しやすい構造を維持
🗂️【strings.xml入門】文字列を一元管理して修正漏れを防ぎ多言語対応にも強くする
文字列を直接XMLへ書く方法は短期的には楽です。
しかし、実務ではほぼ確実に破綻します😥
◉ strings.xmlで表示文言を一元管理
◉ 文言変更時の修正漏れを防止
◉ 多言語対応への自然な拡張
◉ UIとロジックの責務分離を実現
✅【基礎設計を比較】XML直書きとstrings.xml運用の差を整理してつまずきを回避
その場で動く設計と、長く使える設計には明確な差があります。
違いを整理すると本質が見えてきます👇
| 比較項目 | 初心者に多い書き方 | 推奨される設計 |
|---|---|---|
| 文字列管理 | XMLへ直接記述 | strings.xmlで管理 |
| レイアウト設計 | weight依存設計 | ConstraintLayout制約設計 |
| UI幅指定 | 固定値指定 | 0dp+制約 |
| ID命名 | 適当な名称 | 意味が伝わる統一命名 |
| 保守性 | 修正が煩雑 | 修正が局所化 |
🔘【リスナの理解】ボタンが反応しない原因を解決しsetOnClickListenerの考え方
UIを作っただけではアプリは完成しません。
動きを与えるのがイベントリスナです。
◉ ボタン操作の検知処理
◉ UIとロジックの接続ポイント
◉ 機能実装の出発点
◉ 実用アプリ化への第一歩
🎯【今回の結論】Android StudioでUI設計と文字列管理を固めればメモ帳アプリ実装
アプリ開発で最短距離を進むコツは意外とシンプルです。
基礎を雑にしないことが最大の効率化になります✨
◉ Android StudioではまずUI設計を正しく理解
◉ XMLレイアウトは制約ベースで考える
◉ strings.xmlで文字列管理を徹底
◉ ID設計で将来の自分を助ける
🔗 ボタンとプッシュ時のアクション(リスナ)についての記事です🔻
🔗【次に読む】初心者でも無料で挑戦できるAndroidアプリ開発の全体像と学習手順
Android Studioを使えば、プログラミング初心者でも無料で本格的なAndroidアプリを作れます。
とくに、メモ帳アプリやToDoアプリは構造がシンプルで学習にもぴったりです。
下記の記事では、以下のステップでアプリ開発の流れを詳しく紹介します👇
◉ Android Studioの基本操作と開発環境の整え方
◉ XMLレイアウトやボタン操作・画面遷移の基礎
◉ ListViewやArrayAdapterの使い方
◉ SQLiteによるデータ保存で実用的なアプリへ
◉ Google Playへの公開を目指す手順


コメント