
AppSheetでExcel帳票を自動作成して業務効率化✨
毎日のように行うExcel帳票作成に、時間と労力を奪われていませんか。
入力やフォーマット調整に追われて、他の重要な仕事が後回しになってしまうのは大きな課題です😅。
そこで注目したいのが、Googleが提供するノーコードツールAppSheet。
専門知識がなくても、誰でも簡単にExcel帳票の自動作成を実現できます。
この記事では、あなたがすぐに実践できるステップをわかりやすく解説します。
さらに、導入で得られるメリットや具体的な活用事例、注意点までまとめました。
◉ 帳票作成の手間を劇的に削減して時短効果を実感できる
◉ リアルタイムで最新データを反映し、常に正確な情報を共有できる
◉ データを一元管理し、ミスを減らして業務精度を向上できる
【図解付き】AppSheetでExcel帳票を自動出力する手順まとめ
AppSheetでExcel帳票を出力する方法は簡単です。ここでは具体的な手順を4つのステップでわかりやすく解説していきます👍。
Step 1:Automation機能の設定|帳票出力の自動化をスタート
まずは、AppSheetに搭載されているAutomation(自動化)機能を利用します。この機能を使うことで、手動操作を最小限にして効率よく帳票を作成できますよ。
◉ Automationを使えば、ボタン一つで帳票が出力可能
◉ 特別な知識がなくても直感的に設定可能なインターフェース📱
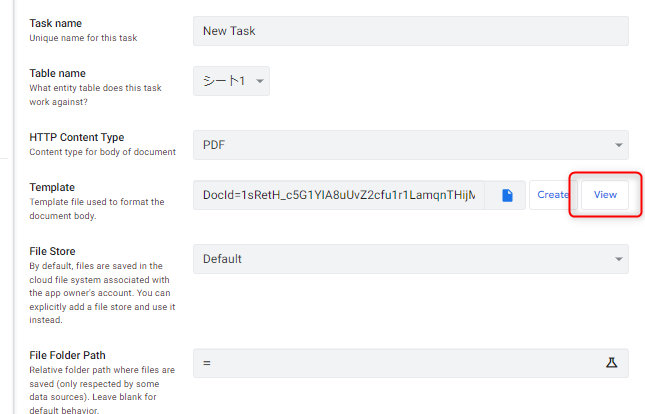
Step 2:「Create a new file」タスクでExcel出力を設定する
次に、「Create a new file」タスクを設定しましょう。以下のポイントを押さえて進めます。
◉ 出力元となるテーブル名や、ファイル形式(XLSX)を指定
◉ Excel帳票のテンプレートをアップロードして関連付け
◉ ファイルを保存する場所や、ファイル名のカスタマイズ方法を決定
Step 3:Excelテンプレートの作成手順とタグの使い方
テンプレートを用意したら、Excel帳票をより使いやすく調整します。具体的には以下の点を意識してください📝。
◉ タグの使い方を理解し、データを動的に差し込み可能にする
◉ セル内ではタグ(<<>>)と通常の文字列を混在させず、別セルに分けて配置する
◉ Excelの通貨や日付表示形式をあらかじめ設定しておく
◉ Start式とEnd式を使って複数行データを効率よく出力する
Step 4:CSVエクスポートでExcel以外のデータ加工にも対応
さらに効率化を図るために、AppSheetのCSVエクスポート機能も併用しましょう。用途に応じて以下のように使い分けると効果的です。
◉ Excel帳票出力機能:レイアウトが整った帳票を作成したい場合
◉ CSVエクスポート機能:Excelでの二次加工やデータ分析を自由に行いたい場合
【実践ガイド】AppSheetのファイル自動生成ステップ
以下の説明は右上の「Improved Editor」モードを解除した「Legacy Editor」での説明です
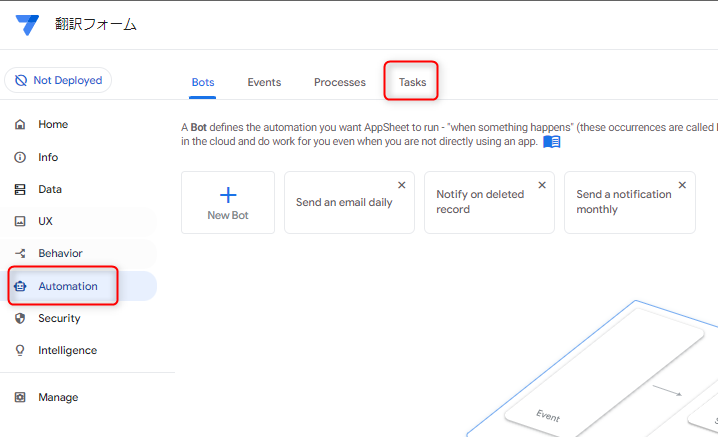
1️⃣ Automationタスクの作成手順|ファイル出力の第一歩
① Automation → Tasks を選択
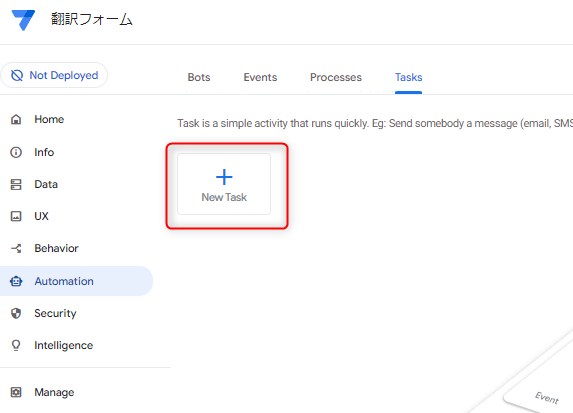
② New Task をクリック
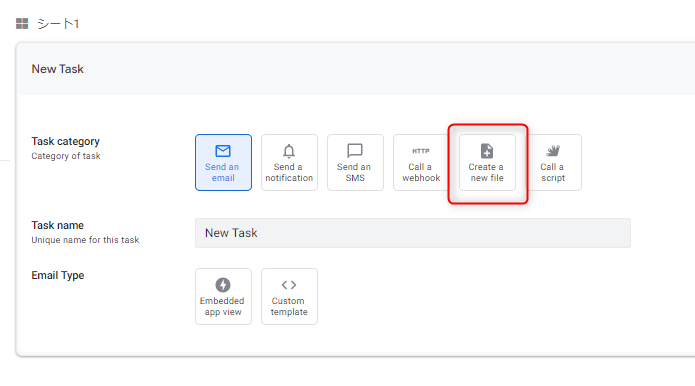
③ Task Category で「Create a new file」を選択
④ Template の横にある「Create」ボタンを押す
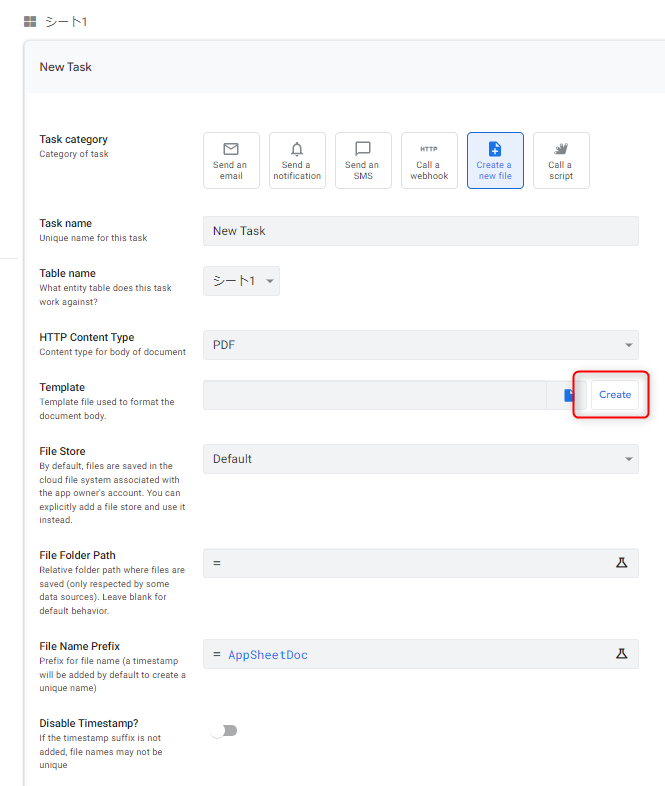
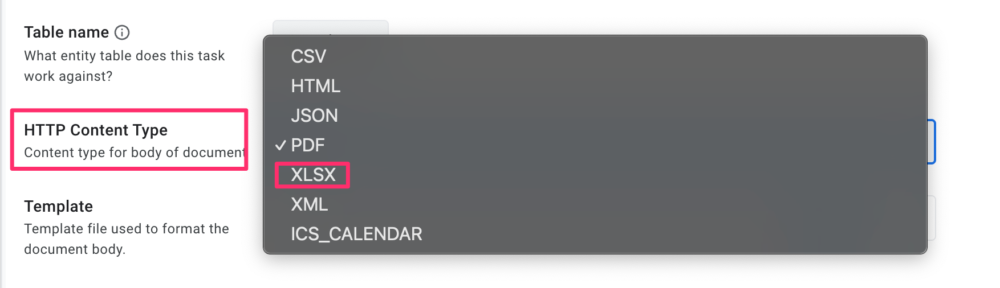
HTTP Content Typeでエクセル形式の指定!
 AOI345.com
XLSXを選ぶことでエクセル形式での出力に対応できます!
⑤ Template 欄に自動で文字が表示される
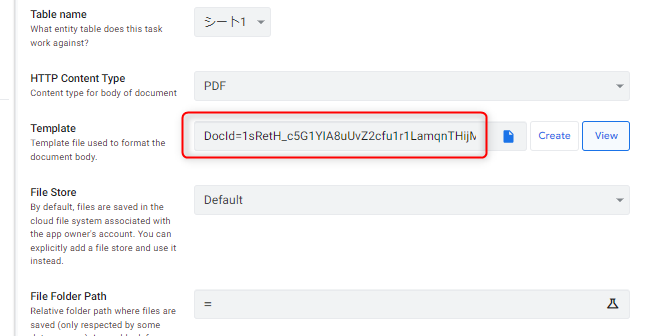
⑥ Template の「View」ボタンを押す
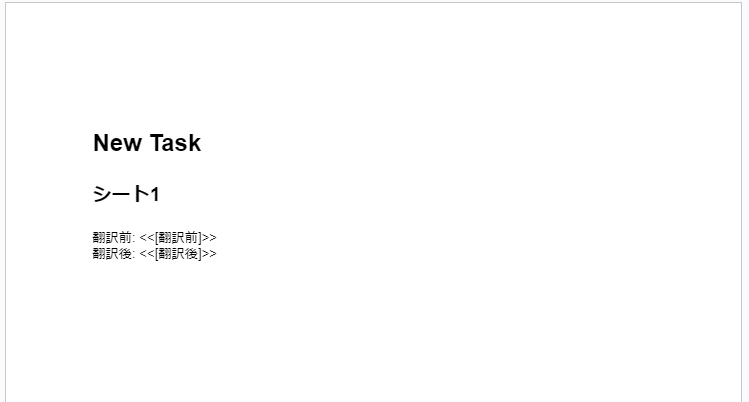
2️⃣ テンプレート設定|Googleドキュメントで帳票フォーマットを準備
① Googleドキュメントが開く(これがファイルフォーマット)
② <<[*]>> のような記述がAppSheetのカラムと連携する可変値
③ データ項目をスプレッドシートに準備(例:トリガ用のカラムを用意)
エクセル形式の場合
 AOI345.com
エクセル形式を選んで作成した場合には上記のようになります。
初期状態から割と十分な出力になっていたりします。
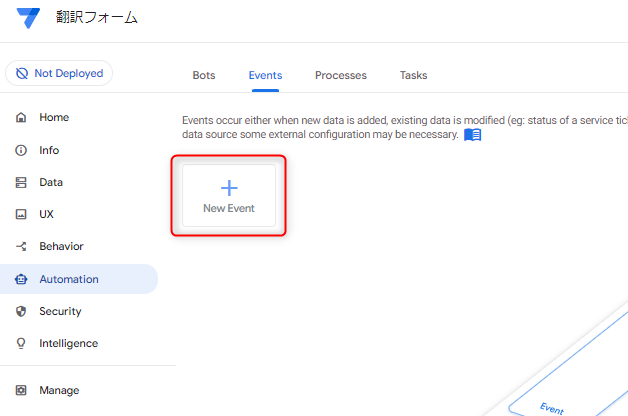
3️⃣ 出力トリガの設定方法|変更検知で帳票自動作成
① Automation → Events → New Event を選択
② Condition のテキストエリアをクリック
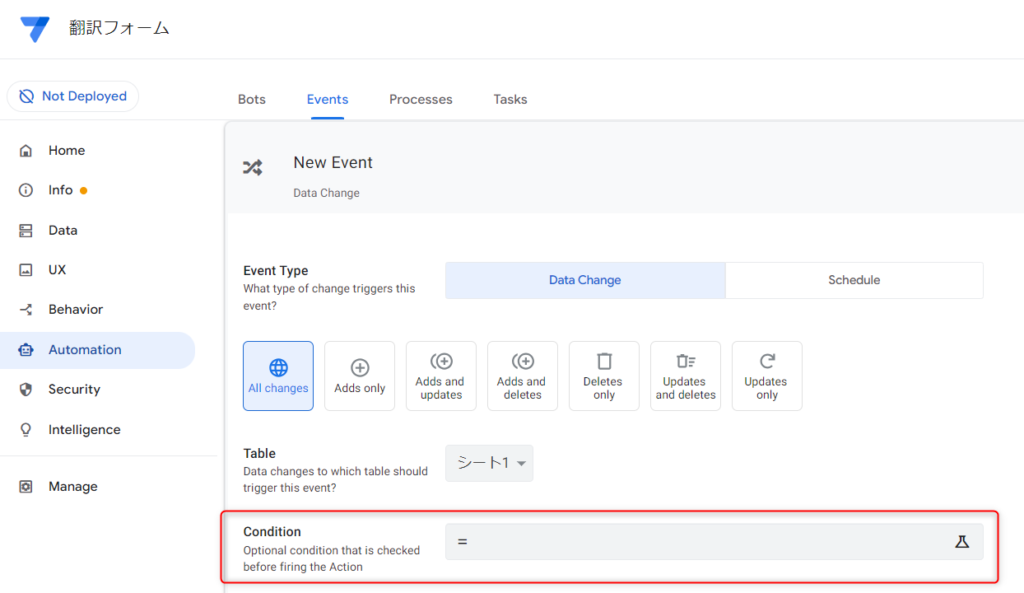
③ Expression Assistant に以下の式を入力し、Save を押す
[_THISROW_BEFORE].[トリガ]<>[_THISROW_AFTER].[トリガ]
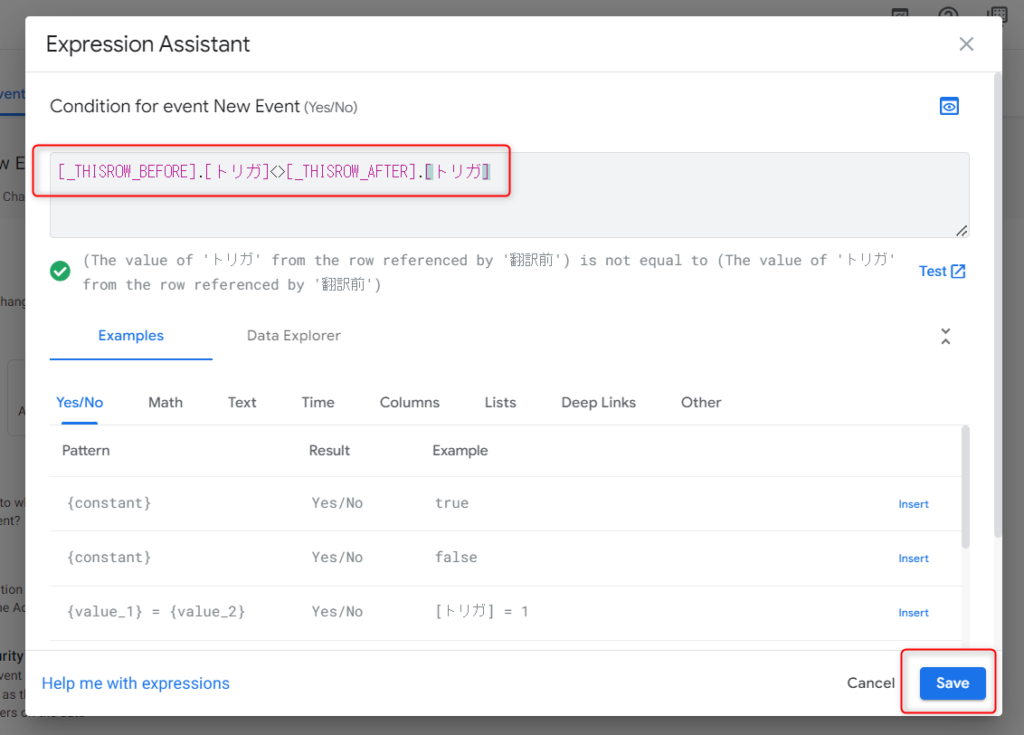
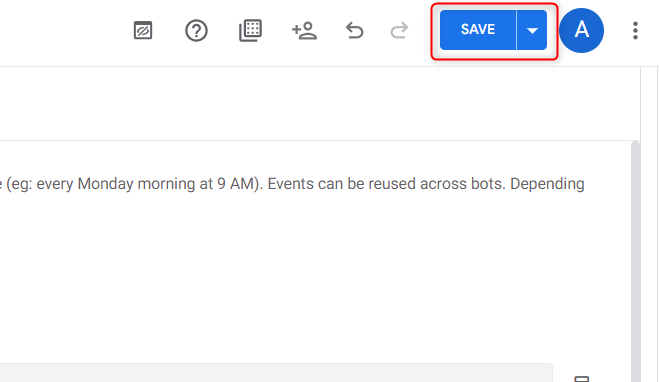
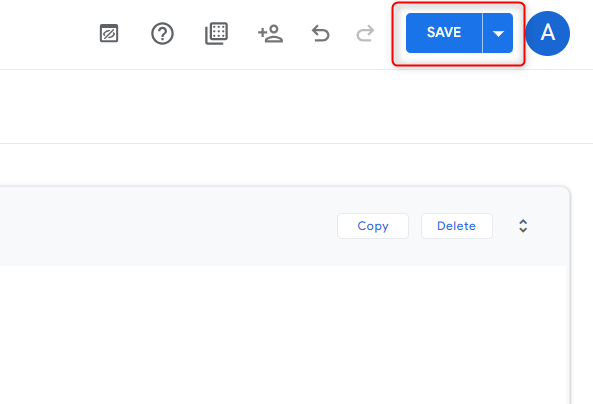
④ 右上の「SAVE」ボタンを押す
4️⃣ Botの設定方法|イベントから帳票作成までの自動処理
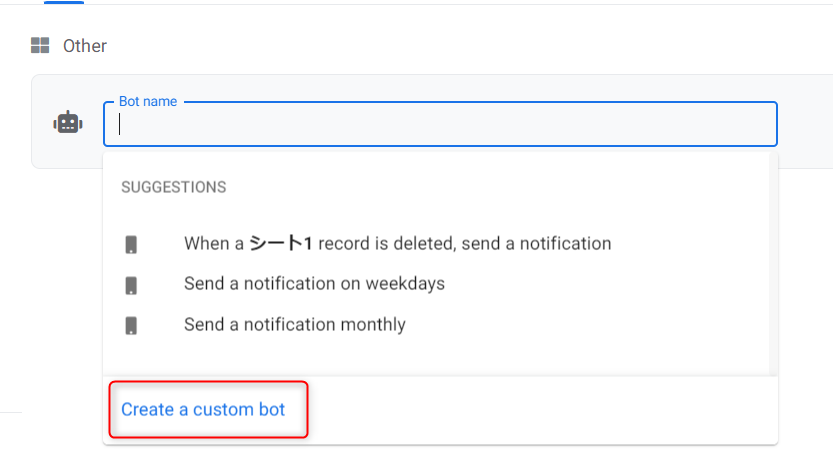
① Automation → Bots → New Bot を選択
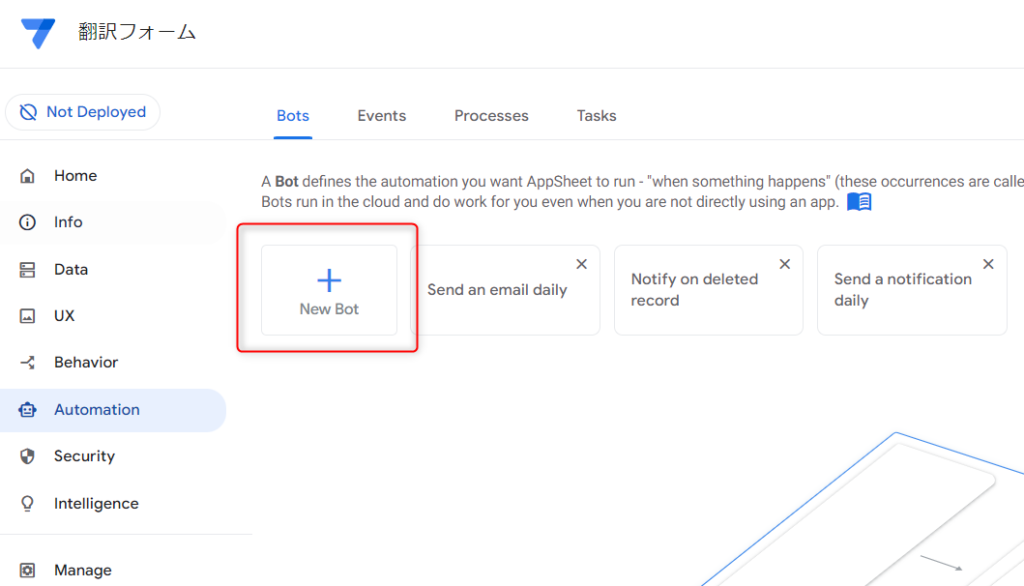
② 「Create a custom bot」を選択
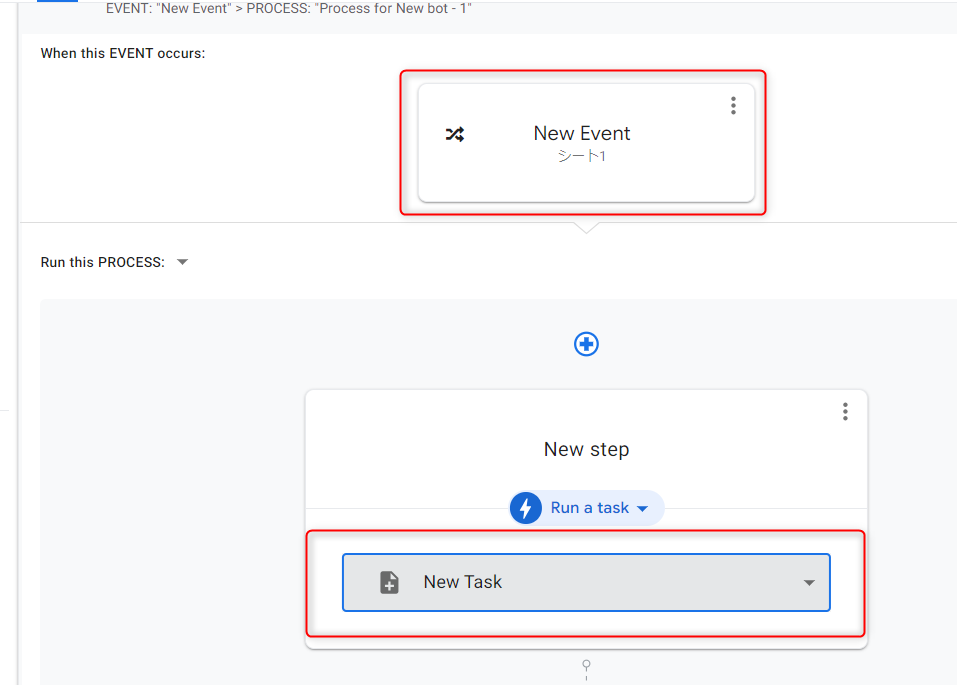
③ EVENT の「Configure event」と PROCESS の「Add a step」を設定
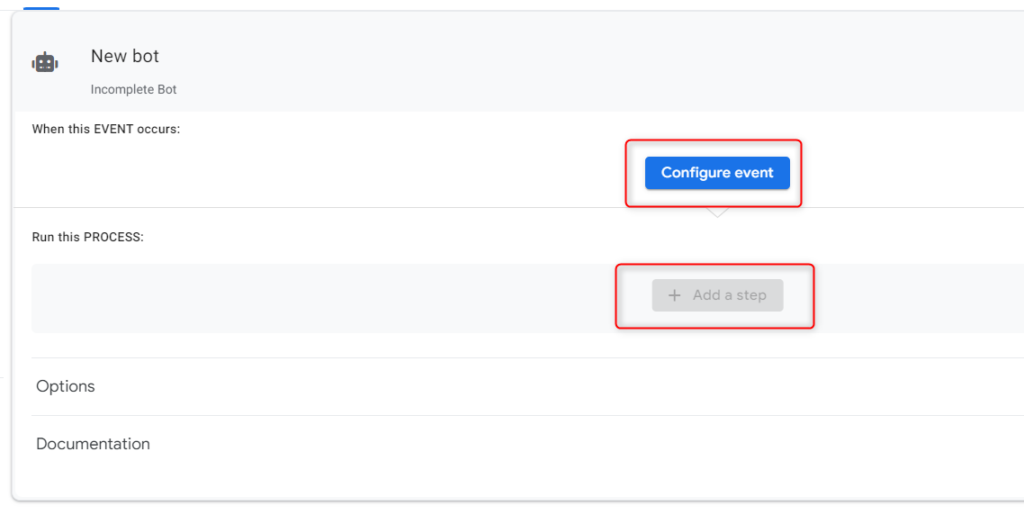
④ 「New Event」と「New Task」を選択し、設定完了!🎉
【応用編】ボタン操作で帳票出力をトリガーする設定方法
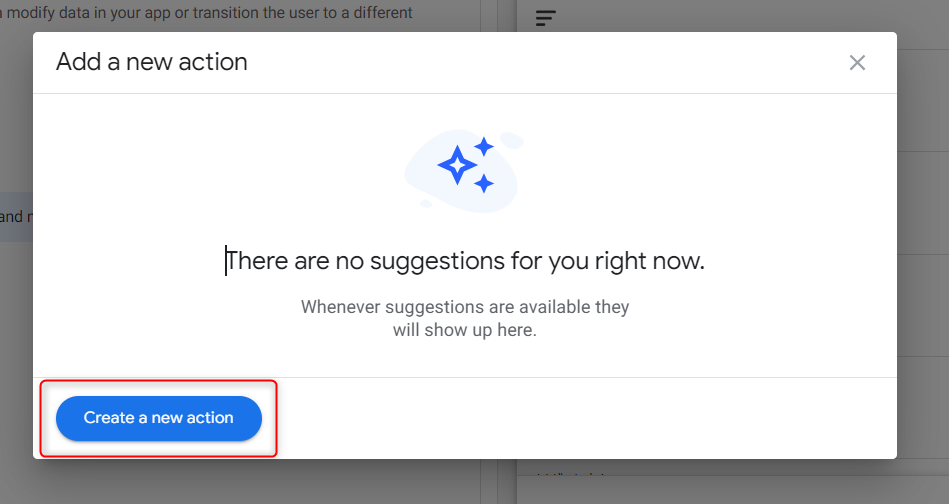
① Behavior → Actions → New Action を選択
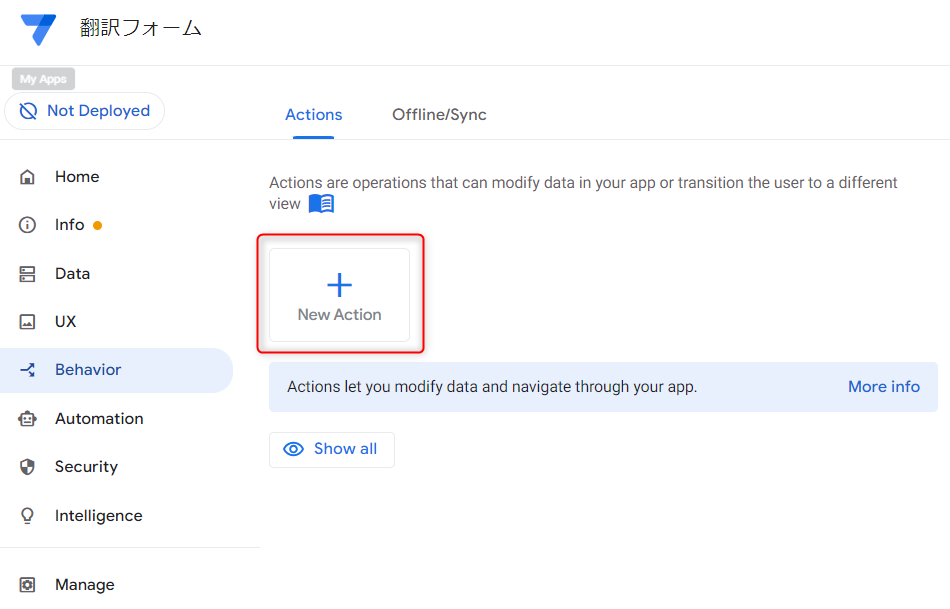
② 「Create a new action」をクリック
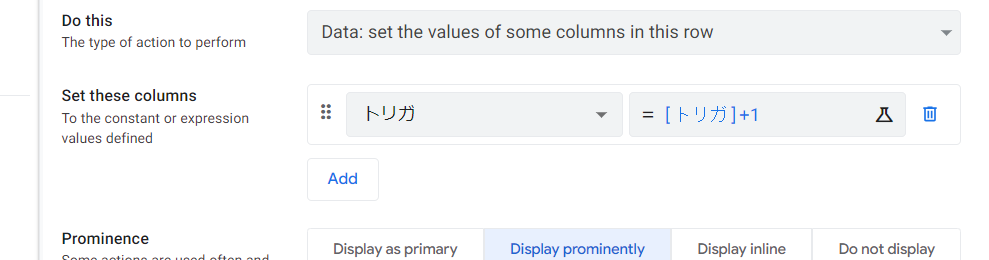
③ 「Set these columns」を設定
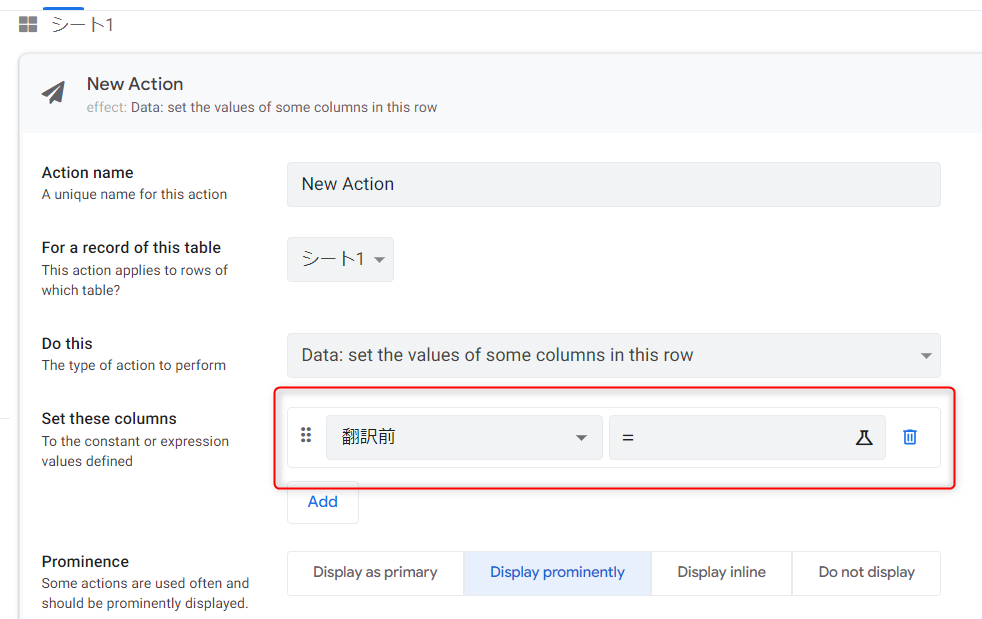
④ トリガの値を「[トリガ] + 1」に設定
⑤ 右上の「SAVE」ボタンを押す
AppSheetでExcel出力を活用する3つの大きなメリット
AppSheetを使ってExcel帳票を出力すると、業務効率化に大きなメリットがあります。ここでは、Excel出力機能を使うメリットを3つに分けて詳しく見ていきましょう。
手作業の帳票作成から解放!出力自動化による時短効果とは?
従来のExcel帳票作成は、データ入力やフォーマット調整など、手作業が多くて面倒でしたよね。しかし、AppSheetを使えばボタン一つで帳票作成が完了します✨。
◉ 帳票作成にかかる時間を劇的に短縮!
◉ 人的ミスのリスクも最小限に抑えられる!
リアルタイムで最新情報を反映!クラウド連携の強みとは?
AppSheetはクラウドベースのため、データ変更が即座に反映されます。これにより、常に最新の情報をExcel帳票に反映できるのです👍。
◉ 情報の鮮度が常に高い状態を維持できる
◉ 帳票を再作成する手間が一切不要になる
データ管理が劇的に効率化!一元化による業務改善ポイント
AppSheetを活用すると、様々な情報を一元的に管理可能。これにより、データ管理の手間が大幅に軽減されます。
◉ 画像や地図情報も含め、あらゆるデータを一元管理可能📂
◉ 必要なタイミングで必要なデータを即座に取り出せる📌
【まとめ】AppSheetで業務効率化を成功させるための3つのコツ
AppSheetでExcel出力を行うと、
✅️ 作業時間の大幅な短縮
✅️ 常に最新のデータ活用
✅️ 一元化されたデータ管理の実現
【活用事例あり】AppSheetで出力したExcelデータの実践的な使い方
ここまでAppSheetでExcel帳票を作成する方法をご紹介しましたが、具体的にどのような活用が可能なのか気になりますよね? ここでは特に活用の幅が広い不動産管理アプリを例に、詳しく見ていきましょう📋。
不動産管理アプリの活用例|Excel出力で業務を効率化する方法
不動産管理業務では、物件の基本情報から契約情報まで、多くのデータを整理する必要があります。 AppSheetを活用すれば、これらのデータを自動でExcel帳票に出力できます✨。
具体的には、以下のような情報を瞬時にExcelへまとめられます👇。
◉ 物件名や所在地などの基本情報🏠
◉ 契約日や委託費用などの契約情報📑
◉ 物件の画像や地図情報もワンクリックで出力🗺️
画像・地図も一括管理!AppSheet×Excelで多様なデータを出力する方法
AppSheetを利用すると、文字データだけでなく、画像や地図、ファイルなども一括管理してExcelに出力可能です。 複雑な情報を簡単に視覚化でき、管理業務を劇的に楽にしてくれます。
◉ 物件の外観や内装写真をExcelで一覧表示可能📸
◉ 地図情報と連携し、物件の位置関係をひと目で把握🌎
データをリアルタイム反映|常に最新のExcel帳票を自動生成
また、AppSheetはクラウドベースで動作するため、入力したデータはリアルタイムでExcel帳票に反映されます。 そのため、常に最新の情報を確認でき、情報更新の手間が省けますよ👍。
◉ 入力した瞬間にExcel帳票にデータが自動反映⚡
◉ 常に最新の正確な情報で意思決定がスムーズに進む🚀
【業務効率化】AppSheetとExcelの連携で得られる3つの実用効果
AppSheetで出力したExcelデータは、不動産管理業務をはじめ、多くの業務シーンで活躍します。
◉ 多様なデータを簡単に出力・視覚化📈
◉ リアルタイムで常に最新情報を維持🌟
◉ 業務効率化と精度の向上が同時に実現✨
【注意】AppSheetでExcel出力する前に知っておくべき3つの落とし穴と対処法
AppSheetはExcel出力を簡単に行える優秀なツールですが、いくつか注意点があります。 ここでは特に気をつけたいポイントと、その対応策を詳しくお伝えしますね🤔。
AppSheetは複雑なExcelレイアウト・画像出力が苦手?制限とその理由を解説
AppSheetからExcel帳票を出力する際、レイアウトが複雑な帳票や、画像を含んだレポートをきれいに出力するのは難しいケースがあります。
具体的には次のような制約があります👇。
◉ セル内でタグと文字列が混在すると表示が乱れる
◉ Excel形式では画像をテンプレートから直接出力できない
◉ 行数が可変になるような複雑なテンプレートは苦手
HTML出力からPDF/Wordに変換する裏ワザ!AppSheet出力の制約を回避
Excelでの出力が難しいケースでは、HTML形式で帳票を作成してメール添付し、それをWordやPDFに変換する方法がオススメです✨。
具体的な手順はとても簡単👇。
◉ AppSheetのAutomationで帳票をHTML形式で出力📩
◉ 受信したHTMLファイルをブラウザで開く🌐
◉ ブラウザの印刷機能から、WordまたはPDF形式に簡単変換🖨️
出力トラブルを防ぐ!AppSheetで帳票作成する際の注意点まとめ
◉ Excel出力はシンプルなレイアウト向き🔖
◉ 画像や複雑な帳票にはHTML経由が便利✨
◉ HTMLをブラウザで開けば簡単にWordやPDFに変換可能📝
【便利グッズ】AppSheet活用を加速するおすすめ書籍・ツールまとめ
AppSheetをスムーズに活用するための書籍&ツールを紹介📚✨
AppSheet初心者におすすめの解説本|ノーコード自動化の入門書
ノーコード開発入門 AppSheetで学ぶアプリ作成 📘✨「初心者でもわかるAppSheet活用術!」

スプレッドシート仕事術 📊「Googleスプレッドシートの便利な活用法を学べる!」

AppSheet開発に便利なツール|ノートPC・タブレットの選び方
ノートパソコン(AppSheet開発向け) 💻「スムーズな開発をサポート!」

タブレット(AppSheetアプリ確認用) 📱「アプリの動作チェックに最適!」

【導入前チェック】AppSheetで自動化を成功させるための実践アドバイス
ここまでAppSheetでExcel出力する方法や活用事例を解説してきましたが、実際に導入する際のポイントやコツが気になりますよね? 最後に、導入を検討中の方へ向けて、成功するためのポイントを詳しくお伝えしますね😊。
AppSheet導入成功のカギは3つ!現場に定着させるための工夫
AppSheetはノーコードで使いやすい反面、適切な導入プロセスを踏むことでさらに効果が高まります。 具体的なポイントは以下の通りです👇。
◉ 業務の中で特に負担が大きい帳票作成やデータ管理など、自動化で最も効果が出る業務を明確にする
◉ 初めから複雑な帳票ではなく、まずはシンプルな帳票出力から試して徐々にレベルアップする
◉ HTML形式やCSV出力など、状況に応じて柔軟な使い分けを意識する
自動化で何が変わる?AppSheet導入後に得られる改善効果とは
実際にAppSheetを導入してExcel出力を自動化すると、次のような効果が得られます✨。
◉ Excel帳票の作成にかかる時間が劇的に短縮され、生産性がアップ⏱️
◉ データ入力や管理ミスが減少し、業務品質が向上📈
◉ リアルタイムなデータ更新で、常に最新情報を共有でき意思決定スピードが向上📡
AppSheetで業務をもっと自由に!理想の働き方を実現する第一歩
AppSheetを導入する際のポイントは、
◉ 業務改善ポイントの明確化
◉ シンプルな帳票からの段階的導入
◉ 状況に合わせた柔軟な運用方法
🔗【初心者歓迎】AppSheetでノーコード業務アプリを簡単作成!
AppSheetは、Googleが提供するノーコード開発ツール。
プログラミング不要で、誰でも無料から業務アプリを作れます📱✨
◉ AppSheetとは?何ができるの?
◉ 無料プランでどこまで使える?
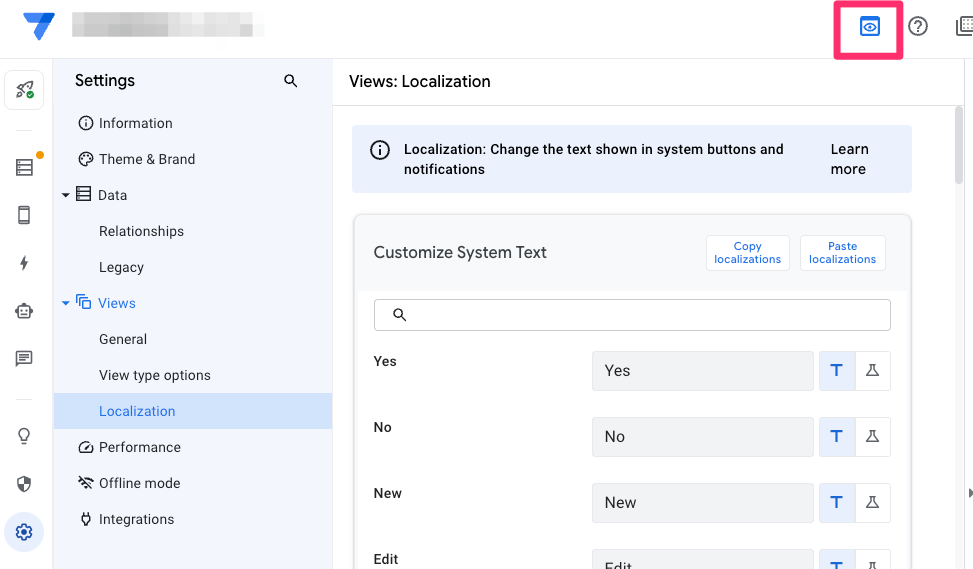
◉ デザインや日本語化はどうするの?
◉ 入力支援やエラー対応のコツって?
✅ スプレッドシートから数分でアプリ作成が可能!
✅ 無料でも主要機能が使えるので安心🆓
✅ UI自動生成&日本語対応で初心者にもやさしい
✅ 外部連携・CSV出力・自動化で業務効率アップ
✅ 403エラーや同期トラブルの解決法も紹介


コメント